Garage Door Cable Replacement: Garage Door Installation
Garage door cables are critical components in the functionality of your garage door system. They work alongside the torsion and extension springs to ensure the door opens and closes smoothly. Garage Door Cable Repair can lead to serious problems, including the door not opening or closing properly, or even posing a safety hazard. Understanding when and how to replace garage door cables is essential for maintaining the security and efficiency of your garage.
Signs Your Garage Door Cables Need Replacement
Identifying the signs of worn-out or broken garage door cables can save you from more extensive repairs or Garage Door Cable Replacement. Here are some common indicators that your garage door cables might need replacing:
- Visible Wear and Tear: Fraying, rusting, or kinking of the cables.
- Difficulty in Opening or Closing: The door seems heavier or uneven when operated.
- Unusual Noises: Squeaking or grinding noises during operation.
- Slack Cables: The cables appear loose or detached from their pulleys.
Steps to Replace Garage Door Cables
1. Safety First
Before beginning any garage door repair, safety precautions are paramount. Make sure to:
- Disconnect the garage door opener.
- Wear safety gloves and goggles.
- Use sturdy ladders and tools.
2. Gather Necessary Tools
You will need the following tools:
- Wrenches
- Pliers
- Locking pliers or clamps
- Replacement cables
- Ladder
3. Release the Tension
If your garage door uses torsion springs, you must carefully release the tension to avoid injury:
- Clamp the Door: Place a clamp on the track below the lowest roller to prevent the door from opening.
- Loosen the Torsion Springs: Using a winding bar, loosen the screws on the winding cone to release the tension in the springs.
4. Remove the Old Cables
- Detach from Bottom Bracket: Disconnect the cable from the bottom bracket on the garage door.
- Remove from Drum: Unwind the cable from the drum above the door.
5. Install the New Cables
- Attach to Bottom Bracket: Secure one end of the new cable to the bottom bracket.
- Wind onto Drum: Carefully wind the cable onto the drum, ensuring it is tight and properly aligned.
6. Re-Tighten the Torsion Springs
Once the new cables are in place, you need to reapply tension to the torsion springs:
- Wind the Springs: Using the winding bars, wind the springs back to the appropriate tension.
- Secure the Screws: Tighten the screws on the winding cone to hold the springs in place.
7. Test the Door
Remove the clamps and test the garage door to ensure it operates smoothly. Make any necessary adjustments to the cables or springs if the door does not function correctly.
Garage Door Installation
Installing a new garage door can enhance the aesthetics and security of your home. Here’s a step-by-step guide to installing a garage door.
1. Choose the Right Door
Select a garage door that fits your needs and style. Consider materials like steel, wood, or aluminum, and decide on the type of insulation and design.
2. Prepare the Installation Site
Ensure the installation site is ready:
- Remove Old Door: Safely dismantle and dispose of the old garage door.
- Check the Frame: Inspect the door frame for any damage or rot and repair if necessary.
3. Assemble the Door Panels
Most garage doors come in sections. Assemble the panels according to the manufacturer’s instructions.
4. Install the Tracks
- Attach Vertical Tracks: Secure the vertical tracks to the door frame.
- Install Horizontal Tracks: Connect the horizontal tracks to the ceiling using brackets.
5. Secure the Door Panels
- Bottom Panel First: Set the bottom panel in place, ensuring it is level.
- Add Subsequent Panels: Attach the remaining panels, securing them with hinges and screws.
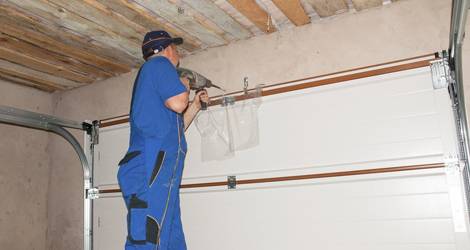
6. Attach the Springs and Cables
Install the torsion or extension springs and attach the cables, following the manufacturer’s instructions carefully to ensure proper tension and alignment.
7. Install the Garage Door Opener
If your door is automated, install the garage door opener according to the manufacturer’s guidelines. Ensure all sensors and safety features are properly set up.
8. Test the Door
After installation, test the garage door multiple times to ensure smooth operation. Adjust the springs and cables as needed for balanced movement.
Maintenance Tips for Longevity
To keep your garage door and cables in top condition, follow these maintenance tips:
- Regular Inspections: Check for signs of wear and tear on cables, springs, and other components.
- Lubrication: Apply lubricant to the springs, hinges, and rollers every few months.
- Clean Tracks: Keep the tracks free of debris and dirt.
- Tighten Hardware: Periodically tighten all bolts and screws.
By adhering to these guidelines, you can extend the life of your garage door and avoid unexpected repairs.